Lab 1
สร้าง Secure Connection ระหว่าง NodeMCU และ HTML5
แก้ไขไฟล์ pieled.ino จาก Lab 4.2 สองจุดคือ
1.ประกาศตัวแปร Client เป็นชนิด WiFiClientSecure แทน WiFiClient ก่อนสร้าง Microgear
WiFiClientSecure client;
MicroGear microgear(client);
2.ภายในฟังก์ชั่น setup() เรียกใช้ useTLS(true) ก่อนการเรียกฟังก์ชั่น init(KEY, SECRET, ALIAS)
microgear.useTLS(true);
microgear.init(KEY,SECRET,ALIAS);
microgear.connect(APPID);
บันทึกเป็นไฟล์ใหม่ชื่อ SecureConnect.ino แล้วอัพโหลดไฟล์ SecureConnect.ino ลงบน NodeMCU
SecureConnect.ino
/*  NETPIE ESP8266 secure microgear connection sample                  */
/*  It differs from the normal connection by 2 stpes                   */
/*     1. Declare a client as WiFiClientSecure instead of WiFiClient.  */
/*     2. Call microgear.useTLS(true) before initial                   */
/*  More information visit : https://netpie.io                         */

#include <ESP8266WiFi.h>
#include <MicroGear.h>

const char* ssid     = "WIFI_SSID";     //change this to your SSID
const char* password = "WIFI_KEY";        //change this to your WIFI password

#define APPID   "YOURAPPID"    //change this to your appid
#define KEY     "YOURKEY"    //change this to your key
#define SECRET  "YOURSECRET"    //change this to your secret
#define ALIAS   "esp8266tls"

/*  1. Declare a client as WiFiClientSecure instead of WiFiClient. */
WiFiClientSecure client;

int timer = 0;
MicroGear microgear(client);

void onMsghandler(char *topic, uint8_t* msg, unsigned int msglen) {
    Serial.print("Incoming message -->");
    msg[msglen] = '\0';
    Serial.println((char *)msg);
}

void onFoundgear(char *attribute, uint8_t* msg, unsigned int msglen) {
    Serial.print("Found new member -->");
    for (int i=0; i<msglen; i++)
        Serial.print((char)msg[i]);
    Serial.println();
}

void onLostgear(char *attribute, uint8_t* msg, unsigned int msglen) {
    Serial.print("Lost member -->");
    for (int i=0; i<msglen; i++)
        Serial.print((char)msg[i]);
    Serial.println();
}

void onConnected(char *attribute, uint8_t* msg, unsigned int msglen) {
    Serial.println("Securely connected to NETPIE...");
    microgear.setAlias(ALIAS);
}

void setup() {
    /* Event listener */
    microgear.on(MESSAGE,onMsghandler);
    microgear.on(PRESENT,onFoundgear);
    microgear.on(ABSENT,onLostgear);
    microgear.on(CONNECTED,onConnected);

    Serial.begin(115200);
    Serial.println("Starting...");

    if (WiFi.begin(ssid, password)) {

        while (WiFi.status() != WL_CONNECTED) {
            delay(500);
            Serial.print(".");
        }
    }

    Serial.println("WiFi connected");
    Serial.println("IP address: ");
    Serial.println(WiFi.localIP());

    /* 2. Call microgear.useTLS(true) before initial */
    microgear.useTLS(true);
    microgear.init(KEY,SECRET,ALIAS);
    microgear.connect(APPID);
}

void loop() {
    if (microgear.connected()) {
        Serial.println("connected");
        microgear.loop();
        if (timer >= 1000) {
            Serial.println("Publish...");
            microgear.chat(ALIAS,"Hello");
            timer = 0;
        }
        else timer += 100;
    }
    else {
        Serial.println("connection lost, reconnect...");
        if (timer >= 5000) {
            microgear.connect(APPID);
            timer = 0;
        }
        else timer += 100;
    }
    delay(100);
}
เปิดไฟล์ switch.html จาก Lab 4.2 เนื่องจาก HTML5 Microgear จะใช้ TLS เป็นค่า default อยู่แล้วดังนั้นหากเราไม่แก้ไขอะไร HTML5 จะส่งค่าเปิดปิดไฟ ผ่านการเชื่อมต่อแบบเข้ารหัส หากต้องการยกเลิกการใช้ TLS สามารถเรียกฟังก์ชั่น microgear.useTLS(false) ก่อนการเรียก microgear.connect(APPID) และบันทึกไฟล์ใหม่ชื่อ UnsecureSwitch.html ดังตัวอย่างด้านล่าง
UnsecureSwitch.html
<script src="https://cdn.netpie.io/microgear.js"></script>
<script>
  const APPID = "YOURAPPID";
  const KEY = "YOURKEY";
  const SECRET = "YOURSECRET";

  const ALIAS = "switch";

  var microgear = Microgear.create({
    key: KEY,
    secret: SECRET,
    alias : ALIAS
  });
function toggle() {
    if(document.getElementById("button").innerText=="off"){
        microgear.chat('pieled','1');
    }
    else{
        microgear.chat('pieled','0');
    }
}

  microgear.on('message',function(topic,msg) {
      document.getElementById("data").innerHTML = msg;
      if(msg=="1"){
          document.getElementById("button").innerText="on";
      }else if(msg=="0"){
          document.getElementById("button").innerText="off";
      }
  });
  microgear.on('connected', function() {
    microgear.setAlias(ALIAS);
    document.getElementById("data").innerHTML = "Now I am connected with netpie...";
  });

//add this line if you don’t want a secure connection
microgear.useTLS(false);
microgear.connect(APPID);
</script>

<div id="data">_____</div>
<center>
<button onclick="toggle()" id="button">off</button>
</center>
ติดตั้งและใช้งานโปรแกรม Wireshark (https://www.wireshark.org/download.html\) ซึ่งเป็นโปรแกรมดักจับแพ็กเกตในเครือข่าย (ในขั้นตอนการติดตั้ง Wizard จะถามว่าให้ติดตั้งไลบรารี่ libpcap ด้วยหรือไม่ ให้ตอบตกลง) เมื่อเริ่มใช้งานโปรแกรมจะเห็นหน้าต่างในภาพ ให้คลิกเลือกที่ Network Interface ที่ต้องการดักจับข้อมูล (กรณีในภาพคือ Wi-Fi) แล้วคลิกที่ไอคอนรูปครีบฉลาม เพื่อเริ่มดักจับข้อมูล วิธีสังเกตว่าควรเลือก Network Interface ใดให้เลือก Interface ที่มีเส้นกราฟขยับ (หมายถึงมีข้อมูลวิ่งเข้าออก)
รูปแสดงหน้าจอโปรแกรม Wireshark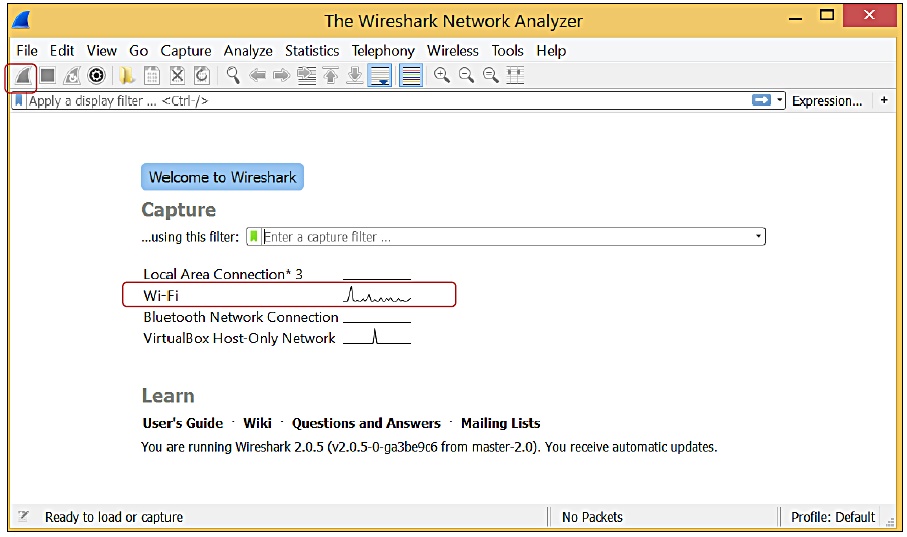
เนื่องจากเราสามารถดักจับได้เฉพาะข้อมูลที่วิ่งเข้าออกคอมพิวเตอร์ของเรา ดังนั้นเราจะทดลองดักจับข้อมูลที่เกิดจาก HTML5 Microgear โดยเปิดไฟล์ switch.html ทดลองกดปุ่ม ON OFF จากนั้นหยุดการดักจับข้อมูลที่ Wireshark โดยกดที่ไอคอนสี่เหลี่ยมจตุรัสสีแดง แล้วลองไล่ดู Packet ที่เกิดจากไฟล์ switch.html วิ่งผ่านคอมพิวเตอร์ของเรา
เนื่องจากมี Packet ที่เกิดจากหลายแอปพลิเคชั่นบนคอมพิวเตอร์ วิธีเลือกดู Packet อาจสังเกตจาก Destination Port ในกรณีที่ใช้ TLSHTML5Microgear จะสื่อสารกับ NETPIE โดยใช้ Destination Port 8081 และ 8084
| วิธีเลือกดูเฉพาะแพ็กเกตที่สนใจ คือการกำหนดตัวกรอง ใส่ลงในช่องด้านบนที่เขียนว่า
“Apply a display filter … <Ctrl-/>” ตัวอย่างเช่น |
| :--- |
| tcp.dstport == 8084 || tcp.dstport == 8081 - Filter โดยระบุ Destination Port |
| ip.src_host==192.168.1.137 - Filter โดยระบุ Source IP address |
| ip.addr==192.168.1.137 - Filter โดยระบุ IP address ของคู่สนทนา |
จากภาพจะพบว่าเราไม่สามารถอ่านข้อมูลที่วิ่งเข้าและออกจาก HTML5Microgear
รูปแสดงหน้าจอ Wireshark หลังเรียกใช้ TLS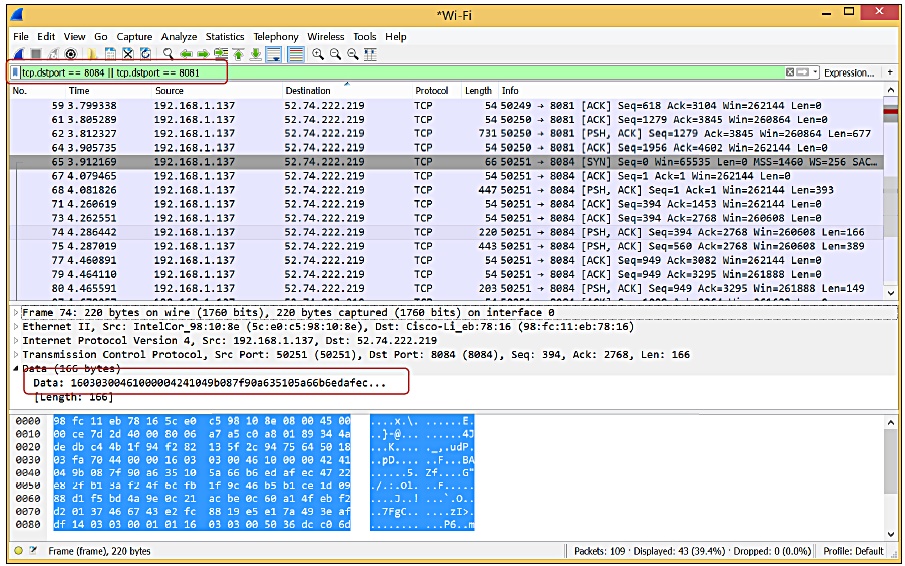
ทดลองเพิ่มเติม
ใช้ไฟล์ UnsecureSwitch.html แล้วทดสอบดูว่าสามารถเห็นข้อความที่ Chat ระหว่าง Switch และ NodeMCU หรือไม่
| การใช้ TLS ในกรณีนี้เป็นการเข้ารหัสการสื่อสารระหว่างอุปกรณ์ใดๆ ที่มี Microgear กับแพลตฟอร์ม NETPIE เท่านั้นไม่ใช่การเข้ารหัสแบบ End-to-end โดยตรงระหว่างอุปกรณ์สองตัว |
|---|